Friday 27 December 2013

Anniversary 62!

Hello!
Thanks for popping by, and hope you've been enjoying the holiday!

My parents married just before Christmas Eve
62 Years ago!!!!!!!!!!!!

They have had a long and happy marriage
(well, most of the time I think!)
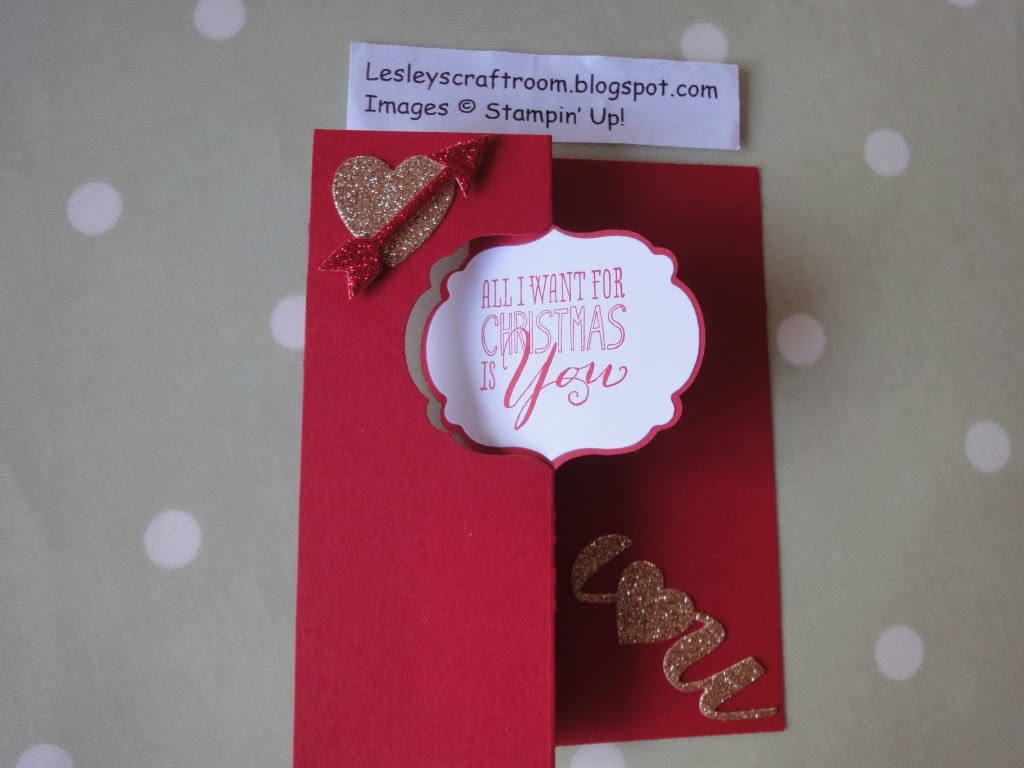
and I made them this.....
 My attempt at CAS (clean and simple)!
I heat embossed the sentiment in gold,
in the shape of 'L' for Love, obviously!
Added some glimmer paper in red and gold
I like the sentiment layout,
and wondered if you think it would look good for any occasion?

(I always have trouble spelling 'occasion'.....thank goodness for spell check!)

Have a good weekend
and I'll see you soon
Lesley
xxx

Thursday 26 December 2013

Happy Boxing Day

Hi everyone!
Hope you are enjoying the festive season.......
didn't yesterday go sooooo quickly?!!!!

We headed to Tesco today (mad or what?!)
Alan needed some Jeans for work,
and I have to say.....
it was quite quiet (thank goodness!),
and they had his size.....Result!!!!

Here's the card I made him.....
 Have really enjoyed 'Christmas Messages' from Stampin' Up!
Here's the 'flip' side....
So you can see I had a play with my 'Thinlits' too!

I think this is the last of my christmas makes to show!

Wednesday 25 December 2013

Happy Christmas!

Happy Christmas everyone!
I hope Santa came to your house last night?!

I just popped by to show you the cards I did for our Parents....


 Here's both together in case it's a clearer picture
I might have to get more of that lush ribbon,
it's so soft and gorgeous.

Have a wonderful day !

Here's a last cracker!

Tuesday 24 December 2013

Happy Christmas Eve!

I hope you haven't suffered too much in the storm?

All ok here, just a bent bird feeder.

Here's more of my cards to show you....


Might not be your cup of tea?
I like the more traditional, but wanted to try some of the modern ideas out there!
The left one has some ink daubed in the centre of the stars.
Lots of sparkle....

Only ONE MORE SLEEP!!!!!!!!!!!!

Sunday 22 December 2013

Sneak Peak....

As a Stampin' Up! Demonstrator, I get to see some products before they go live.
We have Sale-a-Bration coming up in January, which is a fab time for getting some FREE gifts.
I was lucky to get a preview of a cute Banner stamp set and matching punch.
Here's what I made..... 


It was FAB for some last minute special cards.
I drew a line with a marker pen,
stamped some banners 'hanging' from the line,
folded some Designer Series paper in half,
and punched some banners, leaving the top half uncut.
I then glued the backs only, to give a 3-D effect.

Here's a close-up

I liked it so much, I did one for Alan's Grandad


I made a mistake with the ink colour of 'deck the halls',
(real red instead of cherry cobbler)
but I don't think he'll mind!

I think this is quite a contemporary look, 
and love that I can angle the 'bunting' to suit my greeting.
What do you think?

I may do some with twine and start on next year's xmas cards,
so would appreciate your comments!

I had a lovely day today with my parents, sister and nephew,
celebrating christmas early.
Presents are wrapped, cards are sent,
so just the food shopping then we're done!
Or have I forgotten something?.......
Hope your preparations are going well!

Friday 20 December 2013

Easel Cards

One of my fave cards made with 'Wishing You' and
'Beautiful Season' stamp sets.
Decoupaged parcels act as the 'stopper'

This is known as a 'twisted easel', as it twists at an angle

Thursday 19 December 2013

Snowflakes

Some of my snowflake cards
with crochet snowflakes that can be hung on your tree.
Matching envelopes of course!

Wednesday 18 December 2013

Gift Boxes

Some simple gift boxes made with the Scoreboard,
gift tags from Chalk Talk.
Simply work out the  length, width, and height of your gift,
and you can make your own unique box!

Here's some gift card holders too, for money, vouchers or gift cards
I stamped one in Old Olive, and one in Cherry Cobbler,
cut out the frames, and swapped them over,
to make multi coloured tags.

Tuesday 17 December 2013

Thanks

...or Thx!
Using my new Thinlits circle flip card die,
a very simple thank you card.......


Monday 16 December 2013

Christmas Star

This is a variation on the Starburst technique.

I made a mask by cutting out every other strip, from a hand drawn starburst.
I stamped my focal point star in Island Indigo.

I then inked and stamped snowflakes in the background, added some stars,
a rhinestone, and the greeting.

Obviously I made an envelope with my new best friend, the Envelope Punch Board
from Stampin' Up!


Sunday 15 December 2013

Bring on the cake

Happy birthday Sis-in-Law!
I hope she appreciates there's no numbers on her card!

I've been trying out my new Thinlits flip card dies from Stampin' Up!
Melon Mambo and Silver give it some zing.....


Here's the 'flip' side.....

I raised up the heart and 'sister' on the little banner dies that come in these sets.

We had a lovely family lunch today,
but perhaps I shouldn't have eaten the 'chocolate overload'!
Her Mum made a beautiful birthday cake too.....saving that for later!
The diet starts again in January lol.

It was a lovely day, with her Parents, Grandad, Aunty, Brothers, Sister and Nephews....
we are truly blessed!


Saturday 14 December 2013

shake it all about

Hiya
Sorry I've been absent all week!
Probably like you, I've been busy making cards, boxes, crackers etc.,
in fact it nearly sent me crackers!
Luckily I had a lovely lunch with a friend on Thursday, and a lace making class on Friday that helped keep me sane,
and today the lace group I belong to had it's xmas party too!


I can now show you some of my cards, as the recipients have received them,
so I won't spoil the surprise!

I was with some friends recently, and managed to borrow a stamp that I thought was very cute.
No idea of the manufacturer, but a big Polar Bear cuddling a little one,
sat on an iceberg, looking up at a star.
Hence I used blue ink, and made a 'shaker' frame with my oval framelits from Stampin' Up!
Embossed the background with the polka dot folder, great for creating a snowy scene.
Some chunky glitter from Stampin' Up! to 'shake' about.....
except I think I put in a bit too much!
The frame is cut from silver glimmer paper, ribbon adds a nice border.

Tonight my lovely man is cooking fillet steak for dinner,
and I'll probably have a nice glass of red with it.
How lucky am I ?!?!?!?!
Hope you are having a good weekend too
Lesley xxx

Saturday 7 December 2013

A Whole lot of Love


Part of the new products to celebrate Valentine's Day,
or any other excuse to share the love!


There's Stamp Sets too!

Flowerfull Heart Wood-mount Stamp
Flowerfull Heart £8.95

Follow My Heart Clear-mount Stamp Set
Follow my heart £10.95/£13.95

Love You More Clear-mount Stamp Set
Love you More £15.95/ £19.95

Plus there's more to come!
Wait until you see the Monster Hugs!

Friday 6 December 2013

So, what's new?

Carve your own stamps...that's what's new!

Yep, it's a kit to design your very own stamps !!!!

Have you ever wanted a stamp but couldn’t find the perfect image?
 Maybe you have a special family logo or a sketch you’d like to have as a stamp. 
Well now you can! Undefined is Stampin’ Up!’s new stamp carving product line. 
You define the rubber stamp any way you want.

Included in the Stamp Carving Kit:
* 2 carving tools
* 3" x 4" rubber
* 3" x 4" foam
* 4 wood blocks (various sizes)
* 1 Island Indigo Stampin’ Write Marker
* 3 postcards
* Instruction sheet
* Stamp image templates

PRO TIP: Add a sheet of Clear-Mount Cling Foam to create your own clear-mount stamps. 
Mounting your stamps on the cling foam allows you to make stamps any size you want, 
not just what will fit on the blocks in the kit.

Undefined Stamp Carving Kit
133402
Price£17.95

Follow our Undefined board on Pinterest

Thursday 5 December 2013

get well

Wanted to share a get well card I made....
I got the idea from Pinterest....let me know if it's your idea...
using the oh so versatile Owl Builder Punch from Stampin Up!


I also used the Postcard Stamp and one from Chalk Talk...
Hope it cheers you if you are feeling poorly!
xxxxxxxxxxxxx

Wednesday 4 December 2013

Class

I thought I'd share some projects we made in my recent class.

Here's a simple one we did with Festive Flurries from Stampin' Up!
It has a large rhinestone in the centre, 
and we made an insert instead of adding a sentiment to the front.
Background snowflake in Pool Party, with a sentiment stamped in Island Indigo.
We also made an envelope with my new Envelope Punch Board,
but I forgot to take a pic!

I will be back with our other projects, and instructions so you can make them too!

Tuesday 3 December 2013

birthday double

Here's two cards I sent recently from my stash....

The right hand one is a design from Liz, perfect for a guy.

The left hand one is for an expert  cupcake maker (she makes real ones though!),
and our new card candy from Stampin' Up! makes fab 'sprinkles', don't you think? 

Monday 2 December 2013

Happy Post

This is a happy post, based on a happy post.
Confused?
Our 'adopted' friend Sarn organised a monthly swap for some of us,
whereby we each send one swap in the post to another member.
It's a lovely way of staying in touch, and sharing ideas,
and it's way more exciting to get than a bill in the post!

Here's one I got from Jan recently.
She knows I love Crumb Cake, embossed in gold is En Francais,
and, hard to see, is a little gold embossed button too.

Sunday 1 December 2013

another team make 'n' take

Hi again, I hope you had a good weekend.
Here's a finale to my posts this week.
Jan's make was a simple elegant christmas card with Lovely as a Tree from Stampin' Up!
The photo again fails to do justice.
It's embossed with gold powder, and scored lines frame the picture.
Colour is added with the little accent leaf and cone, and the red background card.

Saturday 30 November 2013

team make 'n' take

Liz's make 'n' take is a lovely natural card
using one of the harvest sets.
The background is a wood grain stamp under the acorns,
and the wheat sheaf is tied with linen thread.


Friday 29 November 2013

Team makes


I hope you had a good week?
Are you saying thank crunchy it's friday?
I hope you are taking time to relax.....

We each do a make 'n' take at our team events.
It's a lovely way of sharing ideas and products, and gives us chance to play!

Here's mine, based on the Starburst technique.

Some of the seasonal designer series paper is very shimmery,
and the ribbon and embellishment add glam too.

I recently learnt the Starburst Technique.
I didn't find it easy at first, as geometry is not my strong point!
However, once I found a magic measurement from Diane Barnes, I was off!

I will share instructions very soon......

Here's a close-up

Thursday 28 November 2013

Team day

Jan's swap was a little......awesome! omg!
First the box....
and if that wasn't enough....

The contents......

Scented candles, and the most gorgeous wreath.
This deserves a few more pics....
Covered in ribbon, adorned with shimmery leaves and flowers,
and a fab 3-d sentiment....
here's a close-up
Jan loves making 3-d objects, and this is undoubtedly one of her best yet! 

Wednesday 27 November 2013

Team Day

Liz's swap was a cute square card, embossed with glittery snowflakes,
(never shows up in photos.....)
a cute stamp from one of Stampin' Up! Hostess stamps sets,
that are amazing value, and some dinky pearls. 


I do like traditional colours for Christmas, do you?
I like the blues, pinks, purples etc., but my faves are the red and green.
Which are your faves?
Do leave a comment if you have the time to share.

Tuesday 26 November 2013

Team Day

Another team day, we got together again to swap projects and ideas.
Here's my 'swaps'.....it's a cracker!


I got the idea from the many you-tubes using the Envelope Punch Board,
new to Stampin' Up!.
I adapted the basic principle to suit what I put inside....shhhh that's a secret! 


I used our seasonal Designer Series Paper, and punched a couple of tags to embellish.
Some red Glimmer paper, and silver ribbon and rhinestone add a bit of glitz.

I will share how I made them very soon.....
have a good week!

Sunday 24 November 2013

Circle Thinlit Shaker

I had to make a monthly swap, so decided to try out my new Circle Thinlit.
This die cuts a card base to make a swing or flip card with ease!

It cuts and scores, so all I had to do was fold and decorate.
I decided to do a shaker, using the Hexagon Punch, and Festive Flurries Stamp Set,
all from Stampin' Up!

Here's the back of the 'swing' section...where you can add a sentiment or decoration

Another view of the front, with chunky glitter in the shaker window


Saturday 23 November 2013

Envelope Punch Board

Can you guess what I've been playing with?
Oh my gosh, this board is a m a z i n g !
You can do so much with it!

I had these cards in my stash that I sent to a fave aunt and uncle,
so all I had to do was make the envelopes!
You can make any size, in any colour, and make boxes too!

The only trouble was....and this will make you laugh.......I forgot to write inside their cards!!!!!
Have you ever done that!???!!!!

I was so intent on getting them in the post!
Oh well, a good excuse to speak to them on the phone!
Plus my Aunt will love being able to 'recycle' them lol!

Friday 22 November 2013

Grandad

Alan's Grandad is amazing, so I managed to find this card in my stash, 
that I thought he might like.
I just added 'Grandad' to a Feeling Sentimental stamp of a Penny Farthing.

This technique could be used for anything that moves!
Just stamp the shadow images, without re-inking.