Sunday, 30 June 2013

Notelets

For this one, I used the 'rock and roll' technique.
I kept it simple (pretty amazing for me!).
I used a single flower from Summer Silhouettes.
Ink the stamp, then roll the edges in a darker or different colour,
giving a two-tone effect.
I then added a little butterfly in a contrast colour.


Saturday, 29 June 2013

Notelets

I'll start with my favourite which was taken from our Stampin' Up! newsletter

First make an aperture by cutting scrap paper with, in this case, a butterfly.
Use the aperture to stamp script background, ink over,
then add pearls and flower.

Friday, 28 June 2013

Notelets

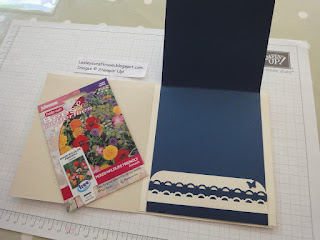
I decided to make some Notelets to put in my
Stationery Holder.
I got the idea from Debbie Kolberg, to make single layer cards,
using different stamping techniques.

This is the inside of the folder

Come back tomorrow for details of the Notelets....

Thursday, 27 June 2013

Stationery Holder

Here's a fun project I did at class recently.
It's a Stationary Holder that I cased from Kimberley Morris.

It's simple made from card stock 11" x 8 1/4",
scored at 5 1/2", turn score at 6 1/2" to make the 'pockets'.
The belt was made from Designer Series Paper 1 1/2" x 11".
I covered it in paper 5" x 6".
Then stamped script background, die cut a butterfly, inked around the edges,
and topped it with another butterfly that was stamped on the same paper as the belt.
I'll be back tomorrow with the 'contents'.

Monday, 24 June 2013

Stampin' Stars Training day

Hiya, hope you've had a good weekend!
I had a fab day on Saturday with lots of lovely Stampin' Up! friends,
full of laughter, inspiration, tips, crafting and cake!

We each make 'swaps' which are little pieces of work,
to share ideas and products we may not have ourselves.
It's often the most treasured part of the day!

I came home with a lovely box full of goodies that I will share in due course.
Here's my 'swap',
a gift tag using the 'emerging colours' technique.

I stamped the oval zigzag design in daffodil delight, then the words in versamark, and clear embossed,
using Oh Hello stamp set.
I then stamped the leaves and flowers from Summer Silhouettes,
then stamped over them in versamark and clear embossing powder again.
The final stage was to sponge all over with tempting turquoise ink,
then buffing to reveal the underlying colours.
A few pearls and ribbbon add the finishing touch.

I hope you have a good week, full of craftiness!

Friday, 21 June 2013

This and That

I hope you've had a good week?
Mine's been full....I did another crochet class,
gardening, housework, paperwork, and of course a bit of crafting!

I started my 'This and That' Journal....
well, I say 'started', all I've done so far is decorate the front cover!
So, another 'work in progress'......


The kit comes with papers, stickers and washi tape, so I did get a bit carried away!
Have a good weekend!

Thursday, 20 June 2013

Ros's card

Fabulous dahhhhhling!

This is the card Ros helped us make using the Fabulous shoe stamp.
You have to see this stamp close up....it's detail is stunning.
We stamped the shoe and butterfly, then decoupaged one of the flowers,
adding pearl and ribbon bow.
We stamped a border and mounted it all on black card, which really sets it off.
I bought a pack of black card, with the intention of using it for lots of backing mounts,
but it's still in it's pack!
Let me know if you've made any projects with black card....

Wednesday, 19 June 2013

Jan's project

I hope you are enjoying the warm weather?!

Here's the project Jan shared with our team.
It's using a stamp from the new annual catalogue due out on 2nd July Shhhhhhhh!

The stamp has been cut with a framelit die, and inked around the edges.
We embossed a strip for the background, added mini brads and rhinestones.
Isn't it pretty?

Tuesday, 18 June 2013

Liz's card

Here's the card we made on team day, designed by Liz
We used the amazing Doily die, and the Cupcake stamp set.
I made mine flat so that it's easily postable.
Yummmy....makes me feel hungry!

We always have some lovely goodies to eat,
to help us craft,
and have lots of fun and giggles,
so if you'd like to be part of the team, sign up, and join us, it's easy!

Monday, 17 June 2013

Team day

Here's some of the fab projects from our recent Stampin' Up! team day

Ros's fabulous fridge magnet

Liz's pretty Purse

Jan's gorgeous gift card.....
which contained a surprise inside, of a packet of seeds!

Thanks for sharing these fab projects teammates!
More tomorrow!

Sunday, 16 June 2013

Happy Father's Day

Happy Father's Day! 
To all the unsung heroes out there!
I am so lucky to have a wonderful Dad, AND a wonderful Dad-in Law,
to make cards for....

Here's one based on the 'Countryside' set....
torn, inked edges, and quite grungy...

This was based on 'The Open Sea'...
I offset two ovals to give the saturn-type ring,
and die-cut/punched the letters.
Two different styles, but which would you choose?

Thursday, 13 June 2013

June 'Make n take'


For our team day, I chose this project for us all to make.
It's based on Summer Silhouettes, using Calypso Coral, Midnight Muse, and a natural for the leaves.
We added glitter to the flower centres,
some of the new Washi tape from 'This and That',
Two vellum butterflies, die-cut and layered,
a vintage button, and some ribbon.
I would like to thank sharoncheng.com for the inspiration.
Have you used washi tape yet?

Wednesday, 12 June 2013

team play day

Hi there!
Hope this finds you well....
I had a lovely play-day with some of my team-mates,
and would like to share some of our projects....
I am so lucky to be surrounded by some lovely talented people who generously share their inspiration.

Here's the boxes I made them as my 'swap'.
I got the idea from flowerbug.typepad.com,
all made from 12"/12"  card stock.
Hmmmmm photography not my strong point!
So, luckily I took close-ups!
I co-ordinated the cardstock with some pretty papers I had,
then decorated accordingly....
here I cut out the birds, added some gems...
This one, I cut out some cages, and added pearls..
This one, I cut out some birds that I decoupaged, and added some large rhinestones.
Each one had a button and bow.....the blue one I 'feathered' (get it?!) the ends....
They all hold standard card sizes, and had a Velcro closure.

So, which one is your favourite?!

Tuesday, 11 June 2013

Nephew

My eldest nephew lives sooooo far away,
I miss him and his family soooo much.....
here's the card I sent

He's lots of fun, so thought this was apt, with all the tickets too,
and I experimented with the masking/inking technique.

Wednesday, 5 June 2013

Brother

It's a very busy time in Stampin' Up! Land,
but there's still lots of birthdays to celebrate too!

Here's one for B-I-L
using one of the sale-a-bration sets that I don't think I can part with.
This is the ferris wheel

Masculine cards are always difficult, don't you think?
I fancied a change from the golfer stamp I usually use.
I sponged the background with ink, 
using a mask I made from copier paper and the oval framelit dies.
I like adding 'flags' of paper....it adds interest, and uses up some of my zillion scraps of paper!
There's a 'ticket' peeking out above 'celebrate' that says happy birthday.

Saturday, 1 June 2013

Celebrate 25 years of Stampin' Up!

I hope you enjoyed the sunshine today!
I was up to my neck in clearing out one of our ponds.....
well, they say mud is good for your skin!
I was accompanied by a frog, a fish, and numerous newts! 

Well, as usual Stampin' Up! are full of surprises,
and I mean FULL!

There's the new single stamps.....
image


....and special stamp sets to celebrate 25 years of Stampin' Up!