Showing posts with label Happy Birthday Thinlits. Show all posts

Sunday, 13 December 2020

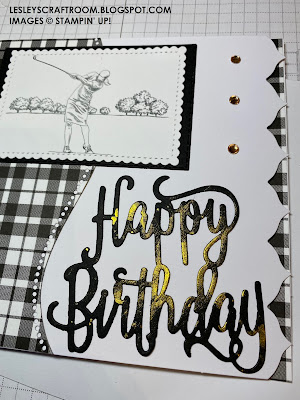
Quite Curvy Golf

Hello friends how are you?

I have lots of Birthday cards to make around christmas, which I always find a bit of a challenge,

well....... more than a bit, truth be told!

Luckily my lovely family in Wales are golfers, and I had this fab Country Club paper.

I'm in keep- it- simple mode here so I teamed it with black & white Plaid paper,

a die cut HB, and a die cut curve.


I used the 'other half' of the plaid to decorate the inside.... 


Splatted gold shimmer paint around and added gold gems to make it more girly.


The card base is a pack in my stash with a decorative edge.


Have a Super Sunday
Lesley
xxx
xx
x
Edited to add it's actually a female golfer :)


Saturday, 29 June 2019

Shimmer Paint Class

Hello there
I hope you are managing to keep cool wherever you are.

I held a class on Shimmer Paint recently.
Everyone got a pot of gold and tried out a few techniques.
I used some old packaging of cardboard in a cellophane bag,
to hand out as paint "pallets" .
I love sharing ways of saving money and recycling.
It can also save your best china from being ruined for example!

I also handed out a document listing some of the ways to use shimmer paint.
(Do ask if you'd like a copy. It's a simple word doc I can email)

So the first thing we tried was "faux mother of pearl".
This would normally be done using frost or white paint,
but we used the same method of scrunching some food wrap,
and pouncing on some card, adding some ink blending once it dried.


Next we blended some gold paint with some inks, and swiped them across the card.
Yellow, orange and red created a sunrise/sunset effect.


Sprinkle some water droplets, and you get the faux bleach effect.
Add some ink splats in the same colours, mat onto black card and you have a nice background.


A simple die cut from black card makes a fairly quick project.
A die cut or spare card can be used to pick up any left over paint.
The paint can be mixed and spritzed in a spray bottle. 
I tried it out with blue and green ink initially, but went for vibrancy in the class.
Having collected some pine cones, I also tried the paint on one.
Great for xmas or other celebrations, it can be used on fabric, wood, ceramic etc.


I was inspired by a post from Amanda Bates of The Craft Spa.
See her post HERE.
I did type a simple word document for class listing the main ways to use the paint,
so do send me your email address if you'd like a copy.

Happy Crafting
Lesley
xxx
xx
x

Shop Online HERE any time, day or night!

REWARDS SCHEME
If you use the current host code for orders under £150 
you will get something extra from me too!
WTCA2DKD 

DISCOUNTS 
If your order is anywhere near £90,
please speak to me first, as you may be better off
buying the 'Kit' where you get £130 of product for £99!

If you join my team you will get lots of benefits
including regular meetings and crafty get togethers .
You don't have to "demonstrate" or anything unless you want to.
You can just enjoy crafting with discounts!

RECEIVE A CATALOGUE
If you would like a Brand New Catalogue 
or any information at all
please do not hesitate to contact me.
or message me on facebook :)

Saturday, 16 September 2017

Fancy Foil

Take some Fancy Foil, die cut a greeting,


 ink over the kraft card,


  polish it to remove excess from foil

 Die cut a different sheet,


inlay greeting, 


 add some candy


If you cut them from two sheets in the same way


you get two cards made quick and simple.


Put them in the sunshine to glisten

Happy Days!

Lesley
xxx
xx
x

Sunday, 11 June 2017

Big Happy Birthday

Have you seen the Stampin' Up! Happy Birthday Thinlits die?!
It's an all-in-one BIG awesome useful and versatile die
and it was TOP of my Wish List! 


I inked two backgrounds with Glycerin and SU inks
(Daffodil Delight, Calypso Coral, Tempting Turquoise)
(the glycerin helps the ink move and blend....a Sheena Douglas trick...I am a massive fan)


Cut a die from one, a die from Basic Black, layered them up to create a "shadow"


Then had two disasters!
Disaster 1 = somehow got a splodge of glycerin that bleached out a splat
(you do know splodge and splat are technical terms, right?)
Disaster 2 = glue showed all round the die because I rushed it,
AND I'm awaiting delivery of the new SU adhesive sheets!


So, Remedy 1 = chop bits off all round a re-mount (can you see the difference?)
Remedy 2 = gently brush Wink of Stella on the black shadow =  happy accident!

It's hard to see the difference, especially as my photography is so naff,

so here they are again (otherwise you'll be scrolling up down up down)


Luckily my Nephew will know nothing of this drama,
and instead can just enjoy a very
Happy Birthday!

Lesley
xxx
xx
x

Order Online and use this Host Code:

XDBCAZYK

for orders under £150
to receive an extra gift from me

BUT

If your order is £150 or more,
you can receive your own rewards!

Not only that, you can get £130 of Products for £99
by simply signing up with me,
AND you continue to get a discount on any other orders you place
whilst you remain a member of my friendly fun team.

It's simple, you choose what you like,
you don't have to sell anything or demonstrate or commit to anything,
and you can return to being a customer at any time,
there's simply NO catch!

If you need ANY help, just email me:

gillettlesley@gmail.com